#tutorial speaks
Explore tagged Tumblr posts
Visit Tumblr Blog
Explore Tumblr blogs with no restrictions, modern design and the best experience.
Last Seen Tumblr Blogs


Fun Fact
Kazakhstan’s Minister of Communications and Informatics has blocked the Tumblr site because it contained 60 sites of terrorism, extremism, and pornography in 2015.
Text
(If you want, reblog)
#exclamation point pfp rpg blog cinematic universe#epprbcu#!cu#punctuationverse#eppfprpg#tutorial speaks#exclamania#exclamia#tumblr polls#poll#the tutorial
27 notes
·
View notes
Note
Do you have any tips on drawing the neck? Also I hope you have a good day :)


these are some of my personal "rules" when it comes to necks so I hope this helps!
#art#threeface speaks#artists on tumblr#artist#artists#oc#ocs#oc - charles bonnet#oc - claire corielle#oc - sebastian cunningham#oc - joe berlioz#tutorial#art process#art study#artwork#my art#digital art#lineart#art tutorial#reference#neck
2K notes
·
View notes
Note
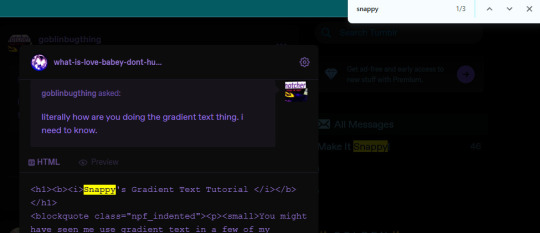
literally how are you doing the gradient text thing. i need to know.
✨ Snappy's Gradient Text Tutorial
You might have seen me use gradient text in a few of my artworks, and it is a great tool to make a posts tand out! I learned from this post, but find some of the information outdated, so I am making a tutorial of my own!
To my knowledge, this is only possible via desktop mode* (mobile method at end), but not the app, as access to the HTML function is necessary. Alongside that, you need access to a text color fader! There's a few options out there, but I use:
Patorjik's Text Color Fader
Let's get to the tutorial!
Have the text you want to turn into a gradient ready and copy it to your clipboard.

2. Open the text color fader and paste your text into the box labeled "your message".
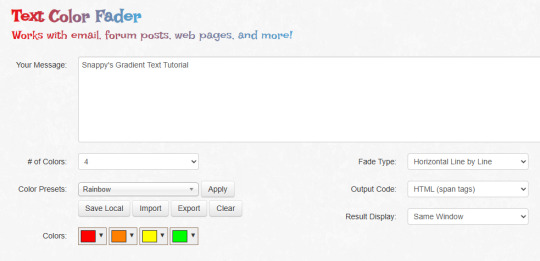
3. For the most basic gradients, you may ignore the boxes on the right. The leftmost boxes allow you to choose between preset colors or making your own colors.
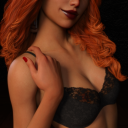
Tip: if you are making a gradient for something such as art, I reccoment grabbing a few hex codes from the image to use for your gradient. This allows you to have control over your colors. You may also save a pallet if you want to use it again


4. When you are happy with your colors, generate your text.

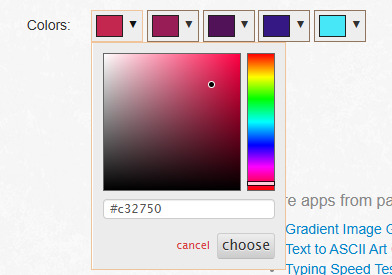
5. You will be brought to this page. If you are happy with the colors, click "select all" and copy the HTML to your clipboard.
TIP: check your text against both a dark and light background to ensure it will be readable to viewers on dark and light mode. If it is not you can tweak the colors by choosing "create new fade".

6. Open Tumblr again and open your post. At the top right there is a grear icon. Click the icon and scroll down to the text editor. Change the setting from "rich text" to "HTML"


7. When you move to HTML, your post will look very different! In the HTML, your goal is to find the text you want to replace in the code.
TIP: If you can't find it, use "Ctrl + F" to open the keword search function and it will highlight your word.
8. Highlight your plain text, right click it, and paste your HTML from Patorjik into the space.
TIP: The HTML is a confusing mess to look at. Click the "preview" tab to check if your code worked


9. You should see a gradient when you swicth modes!

If the HTML broke your formatting, you can edit it in the preview mode. Once you have done a gradient a couple of times this process is very easy and takes LESS than two minutes. It looks intimidating but after you get the hang it is very achievable! I believe in you guys being able to do it. Happy gradient texting for you guys!
*EDIT: It is possible via mobile through the method of entering your account on a web browser and putting it on computer mode, then following the same process. Reportedly it is less comfortable but it works, thank you to chocokeyboard for letting me know!
#sent to snappy#asks#snappy speaks#web resources#tumblr resources#gradient text#tumblr tutorial#gradient text tutorial#loveee doing this for my posts it adds so much#if anyone DOES know if it can be done on mobile let me know! I will edit this post to include it#EDIT: mobile method found! to my knowledge not app compatable but if anyone knows how to do it via app let me know and I will include it!
213 notes
·
View notes
Note
Si aún estás tomando requests, ¿qué tal una reacción de Legend a lo chiquito que era Time cuando empezó su primer aventura? Puede ser algo chistoso o angsty... no sé...
Hola, gracias por el ask! Traté de pensar en una interacción pero no se me ocurrió cómo podría ser, así que espero que esto satisfaga tu request xD

#lu legend#lu time#linked universe#lu fanart#linked universe fanart#for my english speaking besties: Legend finding out how smol Time was when he started his first adventure#pasen tutorial para no colorear como ilustración de wikihow#me mamé y dibujé algo al revés por accidente pero no hablamos de eso 💀#asks#offmozzart
225 notes
·
View notes
Note
any tips on drawing curly hair? i keep trying but my oc always ends up with a bird's nest on their head 😭
UHHH im really not good at tutorials or anything sorry sorry if this comes across as 'draw a circle and you get an owl'-
how i do my curls

93 notes
·
View notes
Note
hello and happy new year! ceci, do you happen to have or could you please make a tutorial on creating teeth if it's not a big hassle? i wanted to make a very particulat teeth shape for my sim, but apparently i do something wrong because the result morphs the whole face in a weird way
gurl the "happy new year" is beating my ass rn, not this exposing the state of my inbox...... 😭😭😭
but ok more seriously, I'll get on with the tutorial 😳
Step 1
first, we're going to use s4studio to create our package. we're going to clone the EA teeth to use as our base.

open s4studio and select "create 3D mesh" under "CAS"
click the blue "CAS" button
Step 2

select "Face" from the Part Type dropdown menu. this will make only the teeth files show up.
we're interested in both "yuTeeth" and "yuTeeth_Snaggle", but select yuTeeth first! (you can hover over each picture to see the names too)
click next, and save your package file as whatever you want.
Step 3

zoom in close to the model with mouse wheel until you can see the teeth, to make sure everything is correct, then go to the "meshes" tab on the right side
export your mesh and save it where you can find it.
note: if you've never used s4s or blender before, make sure your blender location is set up correctly in the s4s settings. otherwise, the sims4studio tools won't show up in blender & we won't be able to edit our cut numbers later.
Step 4
now that we have our mesh, we need to edit it in blender. I'm currently using version 4.2. the controls are different in different versions, so feel free to ask me about it if you're using another version and something isn't working right.

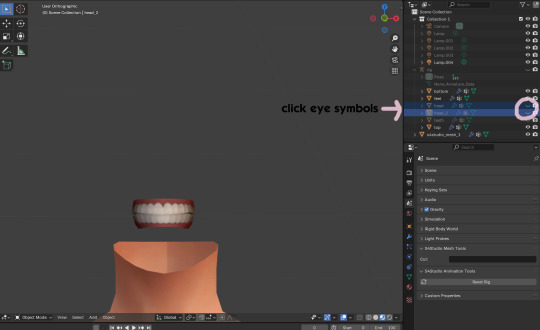
open your mesh in blender. press the N key to get rid of the side panel and Numpad 5 to make the view better/less disorienting. you can zoom in and out with the mouse wheel, and move around by holding the mouse wheel and moving the mouse.
look to the right panel where "rig" is listed. click the arrow to expand the list so you can see all parts of the rig.
click the eye symbols next to "head" and "head_2" to make them invisible so you can easily see the teeth!
Step 5
there are many ways of editing teeth, of course, but what i'm going to show you is basically how to frankenmesh them. this is a good way of creating subtle variety in MM style, without it being overly difficult! we're going to combine the regular and snaggle teeth as an example.
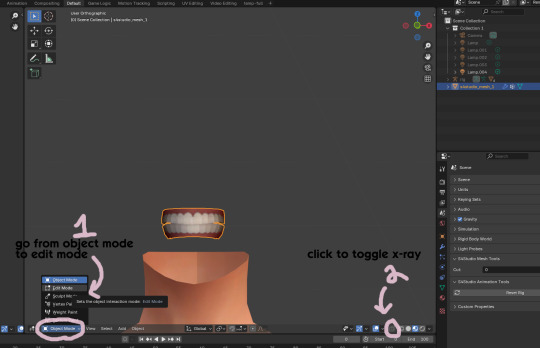
go from object mode to edit mode by clicking the menu at the bottom and selecting "edit mode"
afterwards, click the symbol on the bottom right to toggle "x-ray" so you can see all your vertices when editing.
Step 6

left click in the gray space to deselect all. there will be no orange left anywhere on the mesh.
then, hover over the top teeth and press the "L" key over a vertice (the small black dots) to start selecting the top half only. you should only have to select a couple vertices until everything on the top half is highlighted orange. you can change your view by holding down the mouse wheel and moving the mouse.
Step 7

now, press "X" key to bring up the delete menu.
click "vertices" to delete the parts of the mesh we've highlighted. only the bottom half of the teeth will be left behind. if there's any floating parts left over, highlight those with L and delete them the same way.
Now, repeat Steps 1-3 with "yuTeeth_Snaggle". when you have that mesh exported and saved where you can find it, continue to the next step.
Step 8

go back into object mode. you must be in object mode to append meshes.
go to file -> append to bring up another window

double click your snaggle mesh you just exported
double click "object"
double click "s4studio_mesh_1"
click "append" (if the window didn't close already) and the snaggle mesh will be added to your current mesh!
Step 9
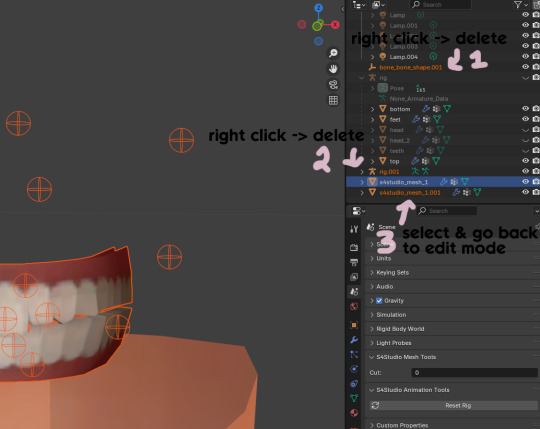
you will see several new mesh parts in the list on the right. right click over "bone_bone_shape.001" and click delete to remove it, since it's just a duplicate.
do the same thing with "rig.001" to delete it as well
select the mesh part you just appended- which is "s4studio_mesh_1.001" to select it and go back to object mode (you can also rename it now by double clicking it if you want)
Step 10

repeat what we did in Steps 6-7 to remove the bottom teeth of the snaggle mesh. you may need to be more careful since these teeth are less straight & overlap more. take your time, and if you make a mistake, you can press CTRL+ Z to undo. you can also click the eye icon next to our first mesh part to hide it so you can see better.
when you're done deleting, unhide the first mesh part to see how it looks together. you now have the top teeth from yuTeethSnaggle and the bottom teeth from yuTeeth on the same mesh! you can mix and match many teeth parts this way.

I decided to rename my mesh parts to top & bottom to keep them organized. you can click the eye symbols to hide either one and see how each part looks. when you're ready, select the top teeth mesh part and return to edit mode.
Step 11
some of EA's meshes have very few polys, so they can be hard to edit, especially if you want to move individual teeth. but, teeth are so small that they don't need/shouldn't have too high of a poly count. having every single tooth be super detailed is overkill, so it's a good idea to only increase polys in the specific areas you want to edit. for this example, i'm going to mainly focus on the front teeth.

select the front teeth by right clicking + dragging over the area you want to select, and it will highlight orange.
go to "edge -> subdivide" to increase the polys in the selected area only, which will give you more to work with. DO NOT SUBDIVIDE TOO MUCH! once should be plenty for this.
Step 12
now for the fun part- actually editing the teeth to be unique! you don't have to do this if you only want to mix & match EA parts, but it's neat to toy around with, even if you just do tiny edits. there's a variety of ways to do this, and I like to do a mixture, but for this example I'm going to use proportional editing.
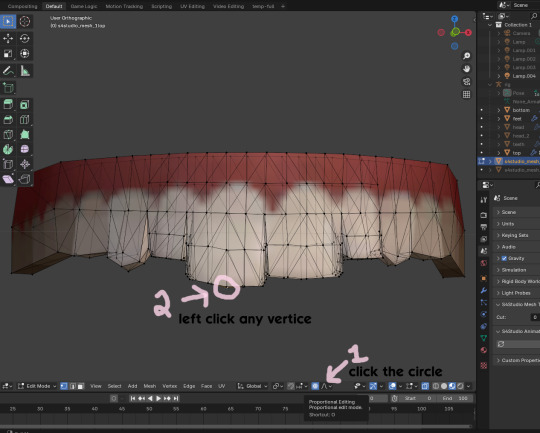
click the circle button to turn on proportional editing
left click any vertice you'd like to edit
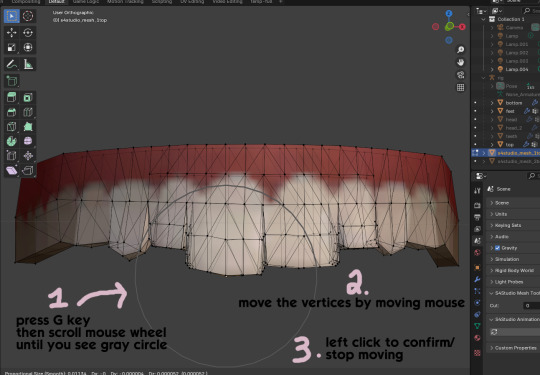
press the G key (move tool) and scroll the mouse wheel forward until the gray circle appears on your screen. this circle represents the influence of editing- the bigger the circle, the wider range of vertices will be moved around that point. the smaller the circle, the smaller/more detailed the change.
move the vertices around by moving your mouse. you'll see right away how it moves. play around with it by using a combination of scrolling the wheel back and forth and moving the mouse.
left click to confirm/stop moving the vertices. you can undo using CTRL + Z if you need to. keep repeating this step by selecting vertices, pressing G, and moving them around how you want. you can also use proportional editing with the S key (scale tool) to make areas bigger or smaller. in blender 4.2, you can also click the tools on the top left side of the window if you want to mostly use your mouse, but I usually use the keyboard.
when you're done editing your mesh and you're ready to test it out, save your file before moving to the next step. keep a copy to the side so you have something to come back to later if you want to change anything!
Step 13
now we're going to prepare our mesh to be game-ready. some of the most important aspects of that is ensuring a) the mesh part is correctly named and b) the "cut" number is correct. if these things are off, the game won't know how to read it, and we'll get odd bugs like missing heads or our mesh just not showing up at all. we currently have two mesh parts and teeth only need one, so we'll fix that first.
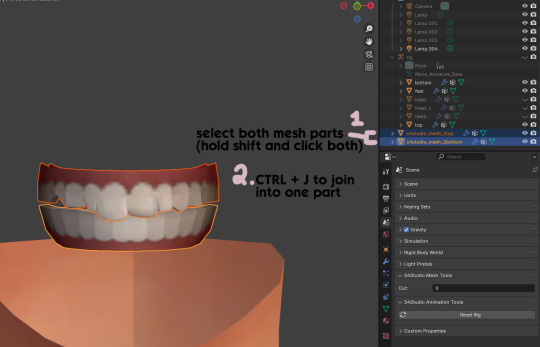
first, go to object mode and select both mesh parts by holding shift and clicking each one.
press CTRL + J to join them together into one part.
Step 14
another thing we need to do is remove doubles so our mesh doesn't look weird or have any odd shadows in-game. in blender 4, it's "merge by distance", but in earlier versions it's just "remove doubles". you should do this when you're done editing, because it'll be difficult to edit after this step. I always do it after I merge all my mesh parts & am about to import for testing. I also double check the cut numbers after this to be sure they're right.
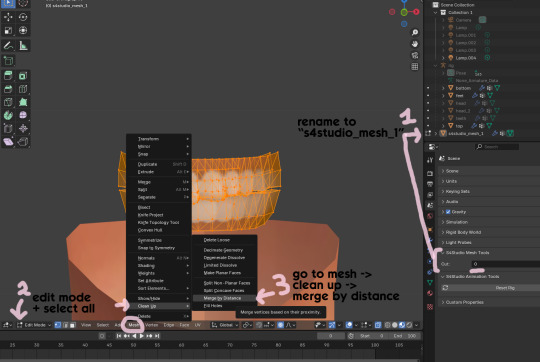
rename your combined mesh part to "s4studio_mesh_1" and ensure the cut number is 0.
go to edit mode and select all by pressing the A key
go to mesh -> clean up -> merge by distance
unhide the "head" and "head_2" parts of the rig you hid in Step 4
save your mesh as a new file name so you don't overwrite your working mesh, in case you want to go back and change something
Step 15
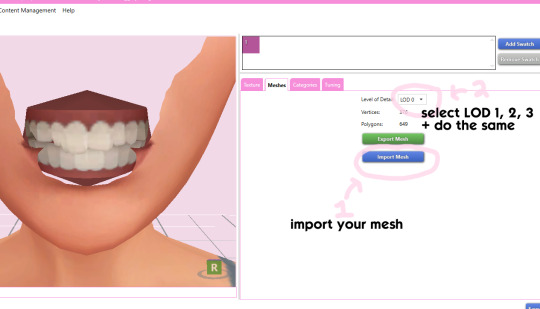
go back into your package in s4studio and import your new mesh
if you like how it looks & are done editing, select LODs 1, 2, and 3 in the dropdown menu and import your mesh there too. these are normally different meshes, but since EA based teeth are so insanely low poly, there isn't much point making individual LODs for them. but it's not that difficult to make them if you want to- if anyone wants a quick tutorial for that, let me know!
Step 16
you can stop here if you want- the teeth will take on the texture of your defaults if you used the yuTeeth package as a base. however, since we've used the Snaggle teeth on top, I think an adjusted texture might look better. I always use the textures by @ice-creamforbreakfast for my teeth, so head over there and grab their defaults if you haven't already! then grab the "uneven teeth" package file and open it in s4s.
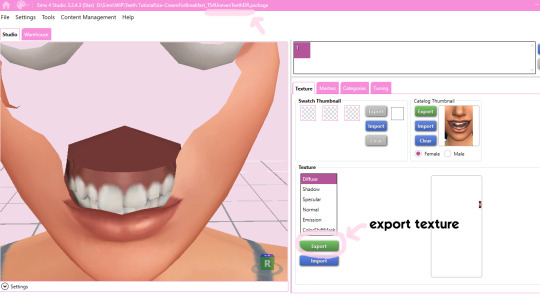
export the texture from the uneven teeth package file as dds
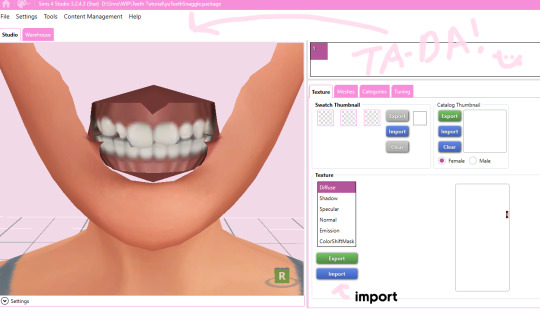
go back to your package file and import it! (and don't forget to credit ice-cream if you post your teeth publicly ;3)
Step 17
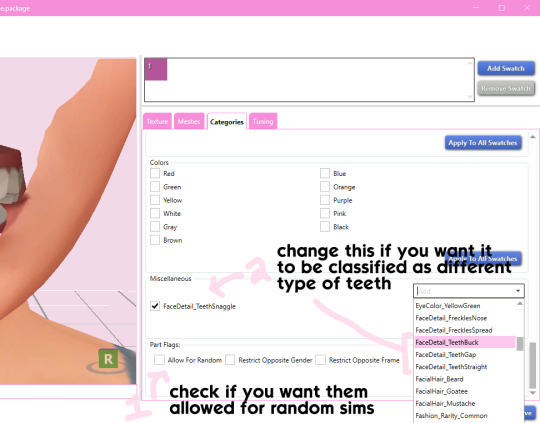
lastly, go to categories tab and scroll to the bottom. if you want your teeth to be enabled for random sims, check the box
if you want the teeth to be considered a certain type (like buck teeth), change the miscellaneous to that type. if it doesn't matter or you're not sure, just keep it as TeethStraight.
Finally, save your package and you're done! :)
#asks#adelarsims#ceci speaks#tutorial#reference#phewph!#long post#i don't think i missed anything#let me know of any questions!
66 notes
·
View notes
Note
Do you have any good beginner drag king makeup refs?
Personally, I'm not the type of king who wears makeup outside of drag, so what I started out with was trying to figure out masc contouring based off of this reference:

Some of the kings on this blog also have makeup tutorials! Probably more than I list here, so if you really like someone's look, I recommend digging through their videos wherever they have them!
Makeup:
Drag King Make-up Tutorial from Adam All
Landon Cider's makeup YouTube account with multiple tutorials
Hugo Grrrl has a couple makeup tutorials here and here
Travis Fiero has a tutorial that I liked
Tenderoni's beard tutorial
King Perka$exxx's cartoon-style makeup tutorial
Practical effect facial hair:
How To Apply A Fake Beard (Drag King Tutorial) by Majic Dyke
Spikey Van Dykey’s curly glitter mustache tutorial
Again, this is a very non-exhaustive list--I recommend checking out the artists on this blog for more! Best of luck to you, and happy kinging!
#drag king#drag king makeup tutorial#info#asks#i can personally speak more to practical effect facial hair if you want me to#but i'm sure people much more qualified than me have better advice haha#but i love hand-laying some crepe hair with spirit gum for my looks#and making my own beards#other folks please feel free to chime in with other good king makeup tutorials you know!
98 notes
·
View notes
Text
I’m trying out Genshin again.
Ugh.
#I keep trying to play it. but after I finish the tutorial it’s just kinda bland to me?#just open world games in general. explorin’ n’ shit.#I know the main aspect is the characters and the gambling thing.#but I don’t get joy from gambling. Even less joy when it’s characters I don’t really care about.#I can tell they share more or less the same model. and they’re just not appealing to me in general.#Please. have skintones other than white Genshin.#give more of the girls pants. please.#Then why do I keep trying to play it when I don’t like it?#Because I keep seeing other people play#it and enjoying it. so I just keep thinking ‘maybe this time will be better’#kos speaks
56 notes
·
View notes
Note
Hey how do you do the color gradient thing for your dialog tags?
Assuming you mean these things, I've actually been meaning to make a guide of my own for a while lol.
For one, you can only do this on computer/the website of Tumblr! There's no option to select this stuff on the app.

STEP 1: CREATE A NEW DOC / GO TO SETTINGS

It opens a dropdown menu/whole screen full of options!
From there, select the "text editor" dropdown, which starts as displaying "rich text".

Select "HTML"

And it should change how the entire post looks!

STEP TWO: CHEAT
Yeeeeeaaaaah, so I use a website for this lol

I inserted my colors for faeries (#30853C) and Cloud (#6DC1B4) for my example of "these things" earlier. To make this easier, I most often have two windows open at a time while working on uploading my scripts to Tumblr.

To get colours to insert into the Text Colorizer website, you can use any kind of hex color picker or even this one website I've used to yoink "thematic" colors from photos!


Personally, I've developed a massive library of colors over time for this exact purpose lol. Using my old colors as a "base", I can change it accordingly to the kind of "new color" that I want for a specific character or thing!


(I'll use the website to also make gradients for "in-between" colors lol)
STEP 3: INSERT TEXT / DESIRED COLORS
To make Nova's gradient, I start with #A600D9, my color for Magic, and end with #F56745—their individual color. However, being as it's short, I'll use a quote from them instead lol.

Once you've inserted your text and colors, you will click in the text box I highlighted in red, ctrl+a and ctrl+c to copy it all, and go back over to your new tumblr post tab!
From there, you'll ctrl+v to paste the entirety into the HTML area, which pastes the code into your post!

AND VOILA!

You have gorgeous gradient text!
However, I want to give a fair warning and a bit of advice! If you didn't notice wayyyyyyy back when...

Tumblr warns that this all can break your formatting!
It doesn't do it too often, but take it from someone who does an obscene amount of formatting... it's 100% true.
STEP 4: CHEAT SOME MORE!
For this reason, I personally have a whole separate draft post full of my characters' colors (and names lol) that I use to copy-paste them in from rather than using the "html" text editor on every post!
I mentioned earlier I often have multiple windows open while editing? Here's what that looks like!

Additionally, I'll use a separate tab off on the left (my "current wip post" side) with the "html editor" enabled for me to copy-paste stuff!
(Also here's yet another example of how many colors I have)

Once again, you can ctrl+c these things to paste them into another tumblr post with the correct colors!
And it's ONLY possible to do on the website!!!
EXTRA INFO!
WARNING:
Tumblr will only allow each "paragraph's html to be so many characters long, so you can't have too big of anything in a gradient!

And by "anything"... I mean you really can't have that big of a gradient in general. RIP lol.
It straight-up won't save the post so long as you have that "overflow" in the character block! MAKE SURE YOU'VE FIXED IT, OR YOU CAN AND WILL LOSE ALL PROGRESS ON YOUR POST!
SINGLE-COLOR TIP:
You don't need the website for a single color! If you'd like, you can just change the "color code" within the html editor to change specific colors!

MAKE SURE COLORS CAN WORK ON DIFFERENT BACKGROUNDS!
On desktop, you can use shift+p while not on any sort of textbox to change the color pallet! I always do tests to see which colors work best before settling on any!

(Tho, the blue background SPECIFICALLY is nightmarish to work around. So if that's the ONLY thing I can't make work, I often ignore it and let you guys who use it suffer lmao)
(Hopefully this'll give you guys some respect for me and how much I do to make my posts aesthetic af lol)
Also hopefully this all helps???
divider by @cafekitsune
73 notes
·
View notes
Text
Ok, you can start just doing your thing. But, if you want to interact with other people, I suggest you look through the posts of the person you're about to interact with. You know, to see what they are involved in.
Also, as of now, very overarching plot relevant posts are on
@plus-minus-contingency
@gnome-armada
@carr10n-exe
Just look through the reblog chains.
Also, don't worry too much about past events, you can look deeper into the posts of
@status-updates
@nefarious-exclam
And a few others I can't remember at the moment
If it interests you
hello..... im a random epprbcu or whatever artist and this all looked fun so i decided to make an exclamation blog of my own BUT!!! i have abseloutely NO Idea... of whats goung on and i need help so what should i know/ whats important in this ""exclamation point pfp rpg blog cinematic unvierse"" and what should i know about running one because ummm.... ummmm.... THIS IS URGENT BVAAAAAA
i already have the character and the... ummm... quirk figured out but i need help on this??!? i just dont wanna be going around like 'hey fellow buckaroos i type weird'
@hashbang-mods (sorry but you inspired me to do this....)
TLDR WHAT IS THE LORE????
#tutorial speaks#exclamania#Exclamation Point PFP RPG Blog Cinematic Universe#EPPRBCU#eppfprpg#punctuationverse#!CU
13 notes
·
View notes
Note
hello Tutorial! how are you doing! i don't have a suspiciously specific scenario for you so please tell me.
-Jay of @glitch-formation
Oh, I'm doing great actually, I was just finishing up this new room in my bunker... (I should probably get a proper home) Anyways, what are you doing around these parts?
#tutorial speaks#tutorial answers#exclamania#Exclamation Point PFP RPG Blog Cinematic Universe#EPPRBCU#eppfprpg#punctuationverse#!CU
30 notes
·
View notes
Note
Do you have any tips on drawing muscles? 
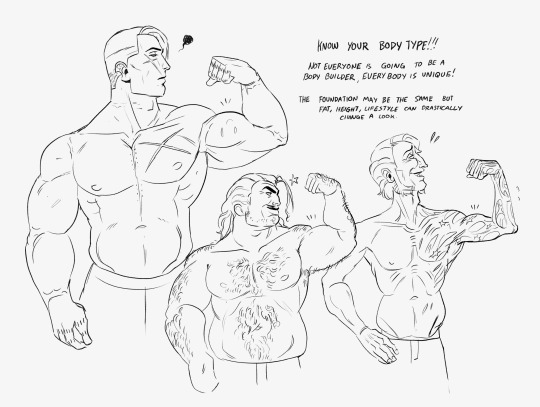
The best tip I can give is to make sure you know what kind of body you're drawing! There are different types of muscle that work in different ways.
For example:

Joe's muscle is different from Charlie's muscle!
One has more body fat, the muscle that Joe has is more of a natural strength of being a middle-aged guy who drinks semi-frequently and carries heavy weaponry all day long. Take note of how little definition there is more focusing on the volume of the body. These are BIG dudes who are built like walls, there's a lot of MASS.

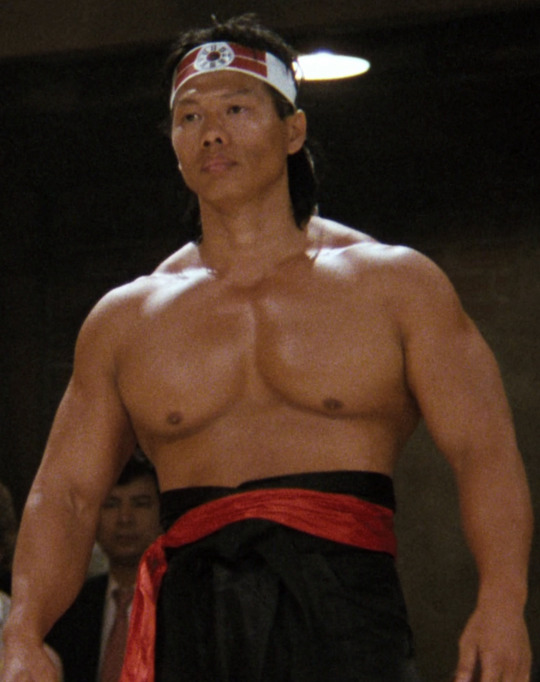
While Charles is way more defined It tells me that these guys deliberately worked to get that body they have with a lot of time focusing on different parts of their muscles. With these types of bodies, you more focus on the big important parts rather than the small itty bitty little details that won't make much of a difference or overdoing it to the point characters look shrink-wrapped and constantly flexing
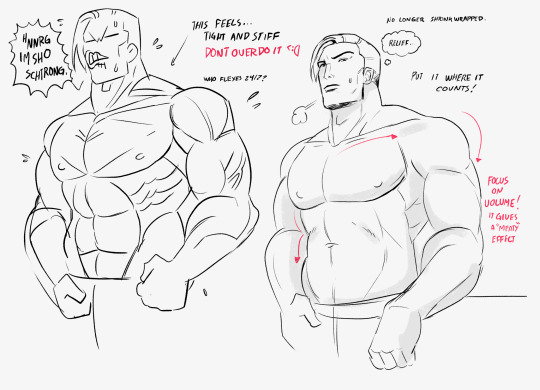
we don't want our characters to look so...tight.
306 notes
·
View notes
Text
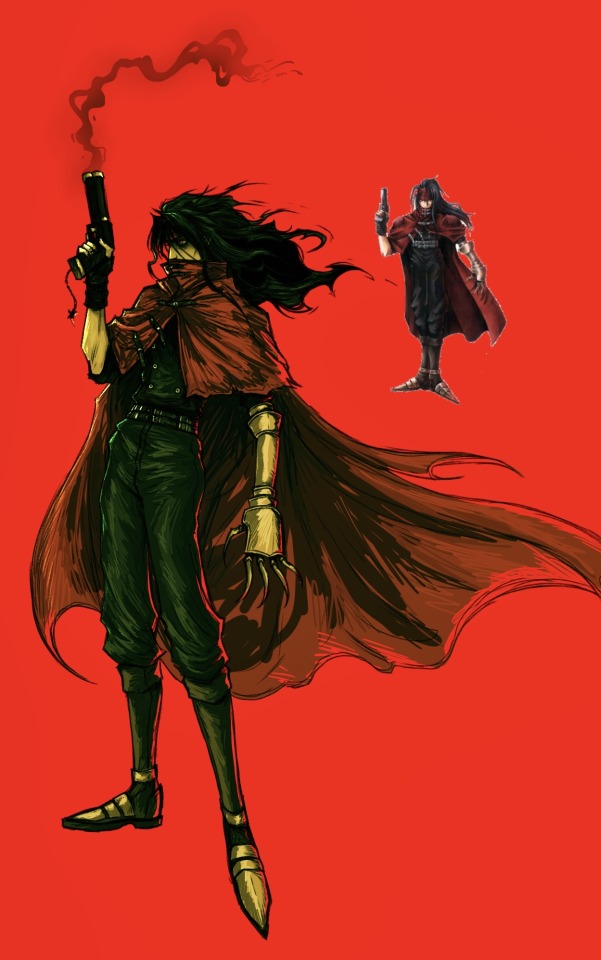
vincent birthday today :0
#happy birthday silly man….#he gives me a horrifying amount of gender envy Google how to become Vincent Valentine TUTORIAL#ff7#timmy draws stuff#fanart#digital art#my art#final fantasy vii#final fantasy 7#vincent valentine#ffvii#they need to show his face in rebirth I am rattling the bars of my enclosure as we speak
783 notes
·
View notes
Text
And he's blue...
I've been wanting to do this ever since Axel told me about Rook's backstory. Dumitru Constantin Diaconu, they could never make me hate you 😭💙 @childrenofcain-if
#thank God for YouTube tutorials because the transitions really killed me#Axel I'll need to speak to the manager during the backstory chapter#series: children of cain#children of cain series#the ballad of the young gods#if: the ballad of the young gods#interactive fiction#interactive novel#interactive game#interactive story#twine#my edits#alight motion
63 notes
·
View notes
Text
Lesson #9: I-I-I- AAAAAAAAAAA
I-I-I- AAAAAAAAAAAAAAAAAAAAA
[
Error: Exclamania-launcher.exe has crashed
If you are a beta tester, please contact the developers at @bug-finder-tyria and send the error logs.
If you are a player please make a support ticket on our web portal www.exclamania.net/support
Thank you for your patience as this game is still under development.
[OK]
]
#tutorial tips#error 501#tutorial speaks#tutorial lessons#tutorials lore#exclamania#Exclamation Point PFP RPG Blog Cinematic Universe#EPPRBCU#eppfprpg#punctuationverse#!CU
24 notes
·
View notes
Note
Yeah!
part one
ur blog is cringe. im sry u had to learn this from me. do u srsly have nothing better to do with ur life than roleplay punctuation on the internet? u should get off the internet and touch grass. pls go do ur homework already u 12 year old.

#tutorial speaks#exclamania#Exclamation Point PFP RPG Blog Cinematic Universe#EPPRBCU#eppfprpg#punctuationverse#!CU
63 notes
·
View notes